The Blog
Managing Highlights and Whites in Bright Photos
April 6, 2022
Table of Contents
Share on Social Media!
Managing Highlights and Whites in Bright Photos – Intro
One of the main ways to asses a photograph, is to see where you eye goes first. Ideally, your eye will go to the subject first and everything else will be context and background. Having extreme highlights and whites in bright photos, will almost always distract the eye away from the rest of the photograph. Sometimes those spots will even obscure details that you really wanted in the photo. This blog post will walk you through how to decrease some of those distracting spots and also get back some detail that might be lost.
Managing Highlights and Whites in Bright Photos – Definition
Now, I’m going to be honest with you. I’m not here to give you some super technical definition that includes a bunch of words we both won’t understand. If you want to be the next Ansel Adams or whatever, my blog probably isn’t for you anyway. I am not one of those people who just loves to harp on the technical details and definitions. I think that you should understand the basics, but I also trust your eye can identify when settings lock into place and make the photo look better. We are not taking a master class in photography. We are improving our skills so we can create images that we love.
For better or worse, I have a different system depending on if I’ve over or under exposed the picture I am working on. Just as a quick reminder, underexposed means that the photo is too dark and overexposed means that the photo is too bright. There are different levels of being under or over exposed, so, before we go any further, this is my plea to do your best to properly expose your photos. A little bit one or the other isn’t a big deal, but if your photos are either extremely dark or extremely light, you’ll have a much harder time in post processing. Do your best to nail the exposure when you’re taking the photo. Trust me. You’ll be so glad you did.

Managing Highlights and Whites in Bright Photos – Overexposed Photos
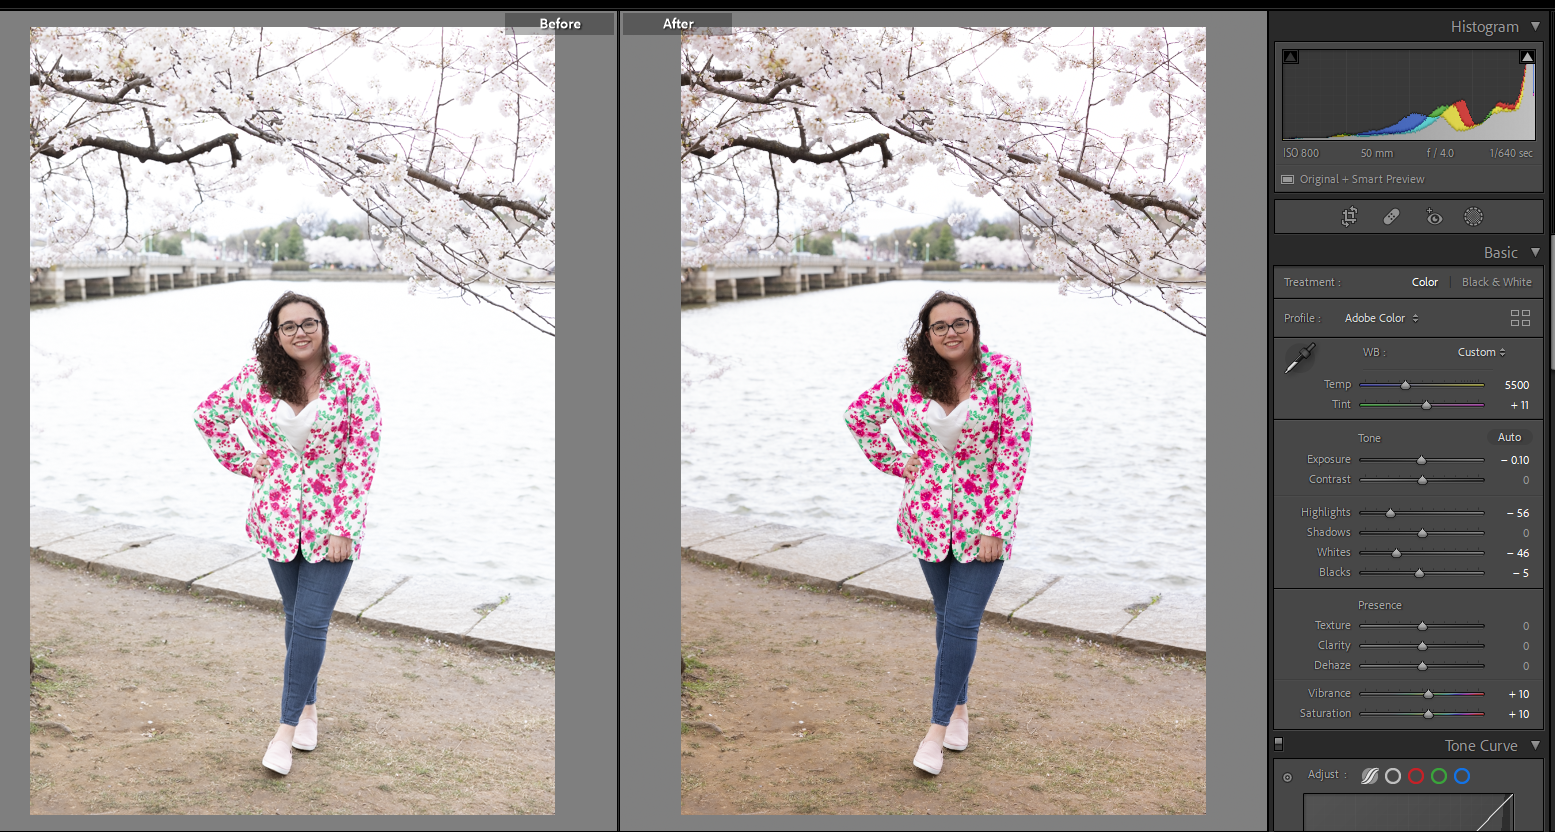
If I’ve overexposed the photo, I fellow my editing checklist and start by working with the actual exposure slider. (Get my editing checklist below.) Exposure affects the overall brightness or darkness and sometimes moving that around can be enough to fix the photo. If lowering the exposure isn’t enough, then I work on the highlights first. Why? Because the highlights slider is focused on the brightest parts of the photo. I’ll pull the highlights out (by going negative on the slider) and see if that helps to solve my problem because it’ll make the brightest parts of the photo darker. Sometimes that will be enough to regain the detail that was lost and I don’t need to mess with the rest of the photo.
This can be a really good trick to deal with a really bright sky or spots of really bright sun. The highlights slider will deal with those spots pretty directly and not affect the light in the rest of the photo.
If I’ve moved both the exposure and highlights down and the photo is still really bright, then I’ll move on to the whites. Think of how bright something is a pure white can be. Much brighter than something that is a bit off in terms of shade. That is the simplest way to describe what the whites slider does – it affects how bright the whites are. All the whites in the photo. Because this slider affects the entire photo, a little can go a long way. This is different than the highlights, which affect just the bright spots, unless you pull the slider to the absolute extremes.
Managing Highlights and Whites in Bright Photos – Underexposed Photos
Just like an overexposed photo, I always start with my editing checklist. remember that exposure affects the overall brightness or darkness and moving that around can be enough to fix the photo. Because the photo is underexposed, you will need to increase the exposure slider to add more light to the photo. If that doesn’t work, I will then jump over to the white slider. Why? Because if the overall photo is underexposed, you probably don’t have that many highlights to work with. Starting with the white slider will brighten up all of the whites in your photo and then you can make a decision about the highlights.
When you’re unsure of what to do, the best thing to do is try different sliders. See what they do and then reset. Or increase each by a small increment so you can see how they are working together. One of the great things about digitally editing photos is that you can always start over. There’s no risk of forever ruining a photo. Don’t be afraid to learn by trial and error.
Managing Highlights and Whites in Bright Photos – Conclusion
As we continue to learn more about post processing, those are skills that you keep in your back pocket until you get home. The only reason you should thinking about highlights and whites on location is in terms of placing your subject and getting your exposure right. When considering where to place your subject, think about open shade and how background light is affecting your subject. Making the best choices you can in terms of light will also help to cut down on the amount of post-processing you need to do.
